[looking for part 1 – the O’Neill Cylinder Model? click here!]
In the early 1980s, Dr. Richard Woodbridge III, a Princeton graduate and retired Vice-President of the New York Life Insurance Company was SSI’s Executive Vice President. The SSI Conference Proceedings and SSI Update Newsletter Archives document much of Dr. Woodbridge’s excellent volunteer work for the Institute, but one little thing he did seems to have stuck in the minds of many long-time SSI Associates: The 3 page paper “How To Make A Model Mass Driver.”

This short document gave everyone with a little extra weekend time the hands-on experience and personal pride of building a conceptual model of one of the most important engineering aspects of The High Frontier Concept.
The SSI Mass Driver is *THE* mechanism to cost effectively launch the raw materials that make those huge SSI Space Manufacturing Facilities, Island Colonies and civilization-changing Solar Power Satellites.
The biggest restriction to such HUGE engineering projects is the cost of lifting the dumb mass of their infrastructures – not the high tech parts, those add up to only a small percentage of the total weight and established rocket technologies can handle that – it’s the dumb support structures that can not be lifted economically from the surface of the Earth. But lifting the raw mass from the surface of the Moon or from Asteroids is a totally different cost structure… when you add the simplicity of the Mass Driver technology.
This small model is a very low powered concept project. It dosn’t have any photoelectric beam detection to automatically turn on the switch as the driver is coming near – a series of these and timing to alternate the currents to provide pull and push forces at the proper moments is how you get the huge speeds in short runs. And this model running at your house doesn’t have the vacuum or the low temperatures that make the Mag-Lev guide system of a real Mass Driver as amazingly efficient. But it IS a working model of the coil pull part of the equation.
It’s a thought starter, great for anyone who has been looking for a jump start warm up project to get the wheels turning on Space Manufacturing and it’s excellent for kids in grades 5-12 looking for a unique Science Fair presentation. Plus, as I found when making mine for the video, it’s just plain fun.
You can just watch the video on the SSI YouTube Channel but to get the full picture you should take the few minutes to read the text of the original paper below; It adds extra enhancements that can make your model a bit more exciting than the one I made for demonstration.
By the way, after seeing that pre-wound spools of 18-20 gauge wire weren’t being wound as accurately as companies had done in the past, I got actual original Radio Shack wire spools on Amazon for just a few bucks, and Home Depot sold me the doorbell button for a penny. In all, the cost was about ten dollars and I did the whole thing in about ten minutes (including the time spent swearing about burning the insulation near the solder point – D’OH!)
***
HOW TO MAKE A MODEL MASS DRIVER
BY RICHARD G. WOODBRIDGE III
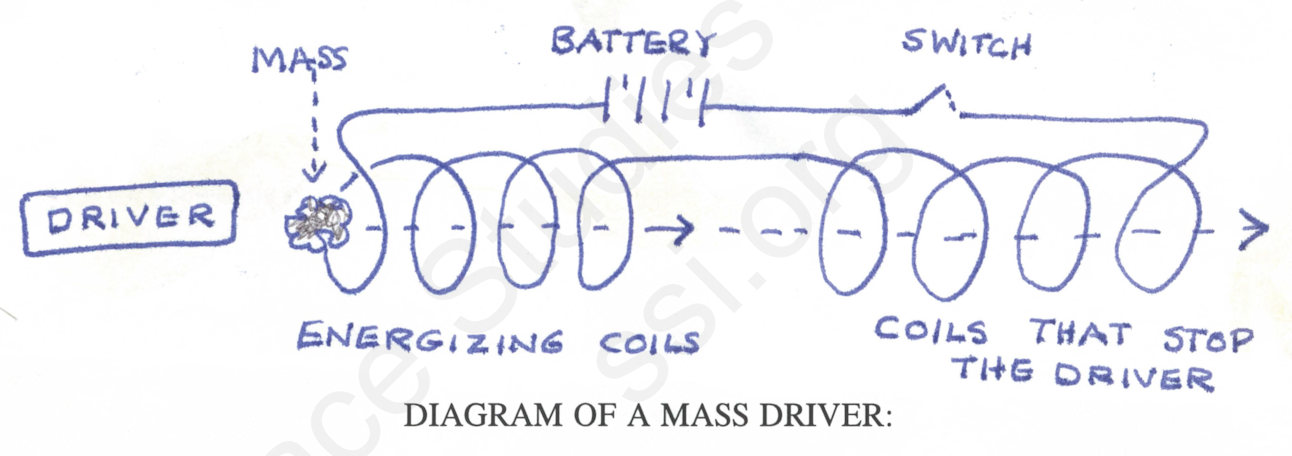
HOW A MASS DRIVER WORKS
A mass driver has four parts:
1. The MASS that shoots out into space.
2. The DRIVER that pushes the mass out and then stays behind to be used again.
3. The ENERGIZING COILS that make the driver move, and
4. The ELECTRICITY, in our model from a battery, which moves through the energizing coils turning them into a magnet which draws the driver into the inside of the coils, pushing the mass, then stopping the driver. The mass shoots out into space.
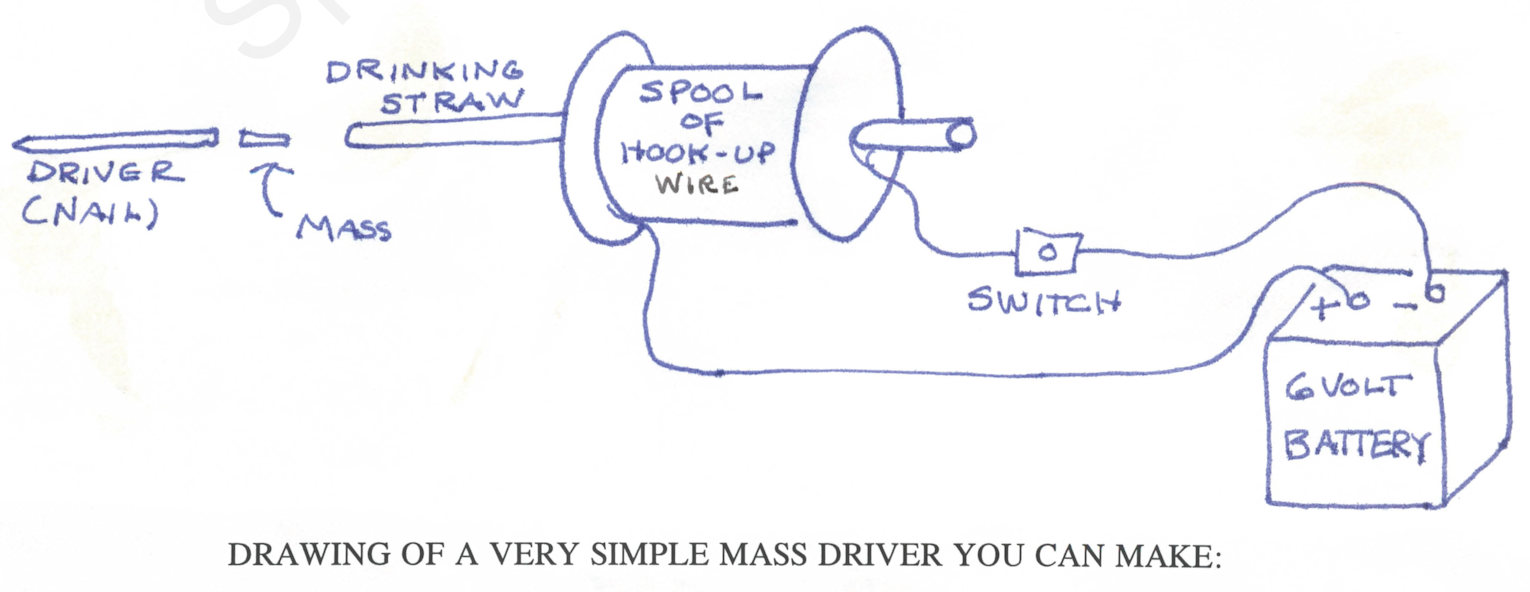
HERE ARE THE PARTS YOU CAN USE:
The MASS. Use a small piece of wood from a wooden match, or toothpick, or twig. Or a small brass screws. That is – something that is not iron or magnetic.
The DRIVER. This must be of iron like a piece iron rod and it must be thin enough to fit inside the plastice drinking straw. A Number 6 or Number 8 Finishing nail works well. A Finishing Nail is a nail with hardly any head.
The ENERGIZING COILS. You can get from a store that sells electronic parts HOOK-UP WIRE that is wound on a hollow plastic core. Get from Radio Shack a spool of No. 18 gauge hook-up wire, 55 feet, stranded. One end of the coil is free on the outside. The other end of the coil sticks out into the inside of the spool. So, you have an energizing coil right there. Scrape the insulation off each wire about a half an inch. This may be tricky for the end that sticks out into the hollow core is short.
The ELECTRICITY. Use a 6 volt lantern battery.
The PLASTIC DRINKING STRAW. You can get from your grocery store (and many other stores). Whatever you get needs to be about 1/4 an inch in diameter and smooth inside.
The SWITCH. At your hardware store get a doorbell button.
DIRECTIONS:
Connect the wires as shown. Put the drinking straw through the spool of wire as near the center as you can. you can pack tissue or modeling putty around the straw to hold it in place. Put in the piece of match stick (which is the MASS), and then put in the nail behind it just so the head end slightly enters the coils.
Press the switch and hold it down a second. The DRIVER will be drawn into the coil. The MASS will fly out the other end. The DRIVER will stay behind.
You have made a mass driver! Not very spectacular, but is is a mass driver.
ADDITIONAL INFORMATION
To make the mass driver more powerful add another 6 volt battery, that is, in series, the plus of one battery to the minus of the other.
A word about what is happening. Do you remember where it is said to hold the switch down for a second? Well, if you let the switch up too soon the coil cannot stop the DRIVER and the DRIVER will shoot out. That is because thie coil does not have the time to draw the DRIVER back before the electricity is turned off.
Also, if you happen to lift the switch, that is stop the electricity just as the DRIVER is being drawn back, the DRIVER may shoot out the back of the tube. So, WARNING, do not get in front of the mass driver. Do not get in back of the mass driver. And do not let anyone else!
A WORD ABOUT COILS
If you cannot for some reason get a hold of the inside end of the coil there are two choices, unwind the coil, get the other end, and rewind it on the same spool, or better yet, though it is fairly hard to do, wind you own coil. If you do wind you own coil then you can have a much more powerful mass driver!
A MORE POWERFUL MASS DRIVER:
The idea is simple, make the wire of the coils much closer to the drinking straw. You could wind the wire right on the drinking straw, but that is very hard to do because the drinking straw is not very strong.
It is best to wind the wire on a piece of a wooden dowel, 1/4 inch in diameter. This wil give you a coil with a center hole (after pulling the dowel out) into which you can slide on the drinking straw. Make the new coil about two inches long and wind all 55 feet on it. The sounds easy, but it is not. It is best to think of rolling the wire on the dowel by turning the dowel and unrolling the wire from the spool.
As you wind, try to keep each winding touching the one before it. You will find that the windings tend to separate one from another and fall apart, stick them together using pieces of tape sticky pieces you can cut off the ends of plastic Band-Aids. you can also use a piece of this sticky tape to fix the wire on the dowel when you start winding. Finish by coating several times with clear nail polish.
ALTERNATIVES
WIRE: Can use Bell Wire (from your hardware store) or 20 gauge hook-up wire.
WINDING: Can wind coil on a wooden pencil. A No. 2 of No.3.
BATTERY: Can use a 10 volt lantern battery.
IDEAS: Make scenery for the mass driver, like on the surface of the Moon or Mars or put out in space with the stars. You can set things up so that a little light flashes on when the switch is turned on, Use your imagination.
IMPORTANT PARTS AND COSTS
Battery – 6 volt lantern battery. Hardware store. $8.40
Wire – Spool of Hook-Up Wire, 18 gauge, stranded, 55 feet. From Radio Shack $2.19
Switch – Doorbell button. Hardware store. $2.40
Copyright 1986 by Richard G. Woodbridge III
***
fyi: we have recently found a trove of photographs of the making of the original SSI and SSI/MIT Mass Drivers. We’ll be releasing those in a special way soon. Also, there are a LOT of MD related items in the SSI Newsletter Archives including one issue from Summer 1980 where Gerry dedicates a whole article to details that will make perfect sense to anyone who has made their own simple working model.
